Tie or Make Your Own Rope Halter
by Connie Nygard
Feel free to link to this page.
Please note: These instructions result in a simple and very functional rope halter. However, the halter does not have the spliced ends or Fiador knot that make horsefriendly halters functional, professional and twist free.
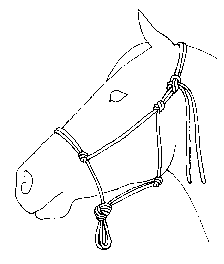
The advantage to using a rope halter on a horse is that it provides good control. The halter is light and comfortable while the horse is behaving but the thinness of the rope gives it some bite when the horse pulls. It is better than a stud chain because it provides control through pressure across the poll as well as the nose and causes no unnecessary pain. A rope halter is best used with a 12 foot lead rope for more leverage.
Caution:
Do not leave any halter on a loose horse.
A rope halter may cut if a horse fights it.
Not recommended for tying a horse in a trailer.
Not responsible for misuse of rope halters.

TIE KNOT 1
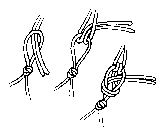
TIE KNOT 2 (easier to loosen)
Time
Time it will take you to learn from these instructions - plus or minus 4 to 40 hours. Money saved - zero.
Money saved on all subsequent halters - $10-15 each.
Time it takes to tie a halter with a lot of practice - plus or minus 15 minutes.
Time it takes to tie a rope halter with a puppy helping you tighten the knots - 3 hours.
Materials
20 feet of 1/4 inch polyester rope. Matches to melt and seal the ends of rope (or to burn the instructions if you get frustrated).
Note: These directions are for an adult horse with an average size head. You may need more for a bigger head.
Directions
Tie simple knots at the distances shown below. Measurements are from knot to knot and do not include knot. Make the knots firm but not tight because you will be bringing the rope back around to tie into those knots. The last knot in about the middle of the rope is a knot with a loop for the tie loop of the halter. After you tie the tie loop you go back and tie into the knots you have already tied.
 Larger View
To tie into a knot, loosen knot and tie into knot following rope path.
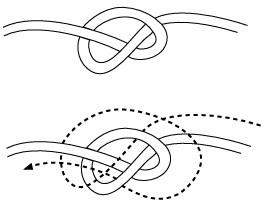
Tie into the left nose knot first. Then then right nose knot to make a double rope over the nose.
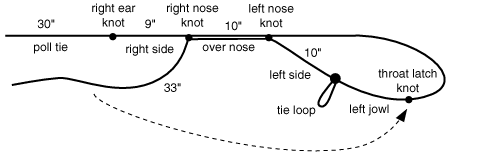
Larger View
Tie into the throat latch knot. Arrange halter as shown so it makes sense. Then tie into the right ear knot.
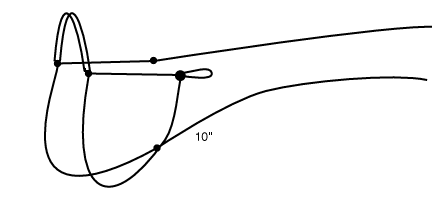
Gather the two 33" sections and tie a big overhand knot at the chin. Test all knots before putting halter on horse. If halter falls apart, knots are not tied correctly. Untie all knots and start over.
Slip knots to adjust size of halter. Trim tie ends the same length and melt them with a match to seal the ends. It is not necessary to attach the two ends together.
© 1995 Connie Nygard
These instructions may be given away but not sold.
More Advanced Instructions for tying a rope halter with a Fiador knot
Return
to horsefriendly.com
Home Page |